DIY Advent Calendar For Kids Christmas Countdown
Christmas is even more exciting when little ones have something special to look forward to every morning! If your kids are constantly asking, “How many days until Christmas?” a DIY Advent calendar is a wonderful way to turn that excitement into a fun family tradition.
And the best part? You don’t need expensive supplies or impressive crafting skills to make one.
A homemade Advent calendar lets you create a personalized Christmas countdown filled with tiny surprises, sweet treats, and meaningful family activities. Whether you have toddlers, preschoolers, or older kids, you can easily customize it to match their interests.
This simple Christmas craft is also a lovely opportunity to slow down during the busy holiday season and make everyday moments feel magical.
Christmas Countdown For Kids Homemade Advent Calendar
There’s something incredibly sweet about watching your child’s face light up as they discover a new surprise each morning in December.
An Advent calendar traditionally counts down the 24 days leading up to Christmas, beginning on December 1 and ending on Christmas Eve.
While store-bought calendars often contain chocolates or small toys, a homemade version gives you complete control over what goes inside.
You can fill each day with something different, such as a little treat, a festive activity, or a thoughtful message.
Why make your own Christmas countdown calendar?
- Budget-friendly: Use craft supplies and containers you already have at home.
- Personalized: Choose surprises that match your child’s age and interests.
- Reusable: Create a calendar that becomes part of your family’s Christmas traditions.
- Creative: Let kids help decorate and prepare the calendar.
- Meaningful: Include family activities instead of filling every day with presents.
One of my favorite things about homemade Christmas traditions is that they don’t have to be complicated to become treasured childhood memories.
Sometimes, the smallest surprises create the biggest smiles.
DIY Advent Calendar For Kids
Making a DIY Advent calendar for kids is easier than you might think.
You can create a beautiful Christmas countdown using simple materials like paper bags, envelopes, clothespins, ribbon, and a few festive decorations.
The basic idea is to prepare 24 numbered containers, each holding a surprise for your child to discover.
You can hang them across a wall, arrange them on a decorative board, or display them along a staircase.
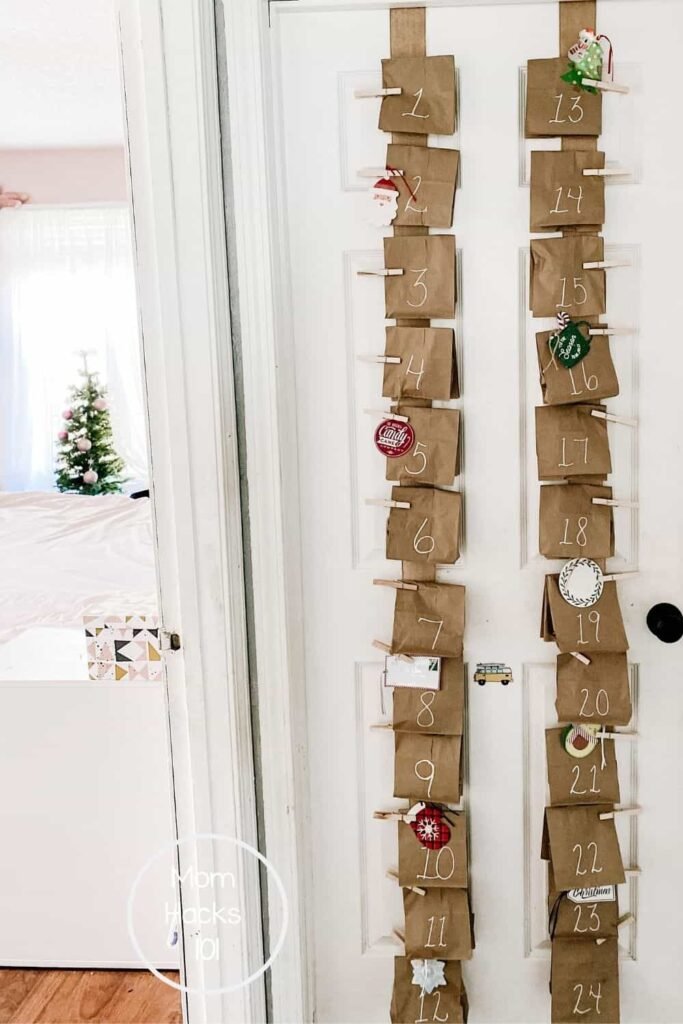
For a simple, charming design, small paper bags attached to twine with wooden clothespins work beautifully.
This style is especially practical because you can easily replace the contents each year.
A few tips before getting started:
- Choose a location your children can see every day.
- Use sturdy materials if you plan to reuse the calendar.
- Prepare all 24 surprises before December begins.
- Mix inexpensive treats with free Christmas activities.
- Keep small items away from babies and toddlers who might put them in their mouths.
You can also make the calendar part of your holiday decorating routine by letting your children choose its colors and decorations.
Traditional red, green, and white are always lovely, but neutral kraft paper with greenery and gold accents can look equally festive.
What can I put in my child’s Advent calendar?
One of the most enjoyable parts of making a homemade Advent calendar is deciding what to put inside.
You certainly don’t need to buy 24 separate gifts.
In fact, combining small surprises with Christmas activities can make the countdown more exciting while keeping your holiday spending under control.
For younger children, consider stickers, coloring pages, or simple activities they can enjoy with you.
Older kids might appreciate craft supplies, mini puzzles, holiday challenges, or coupons for special family experiences.
You can also include little notes that encourage kindness, gratitude, and spending time together.
Pro Tip: If your Advent calendar has small pockets or bags, write larger activities on folded pieces of paper instead of trying to squeeze everything inside.
For example, a note that says “Tonight we’re making Christmas cookies!” can be just as exciting as opening a physical present.
Advent Filler Ideas For Kids:
Here are some fun and affordable Advent calendar filler ideas that kids will love.
Small Gifts And Surprises
- Christmas-themed stickers
- Mini coloring books
- Holiday pencils and erasers
- Small toy cars
- Hair clips or scrunchies
- Festive socks
- Washable temporary tattoos
- Mini animal figurines
- Character bookmarks
- Colorful crayons
- Small tubs of play dough
- Finger puppets
Sweet Treats
- Individually wrapped chocolates
- Candy canes
- Mini marshmallow packets
- Christmas cookies
- Small bags of popcorn
- Chocolate coins
- Fruit snack packets
- Homemade gingerbread treats
Choose age-appropriate foods and check for allergies or choking hazards.
Christmas Activities
- Decorate Christmas cookies together.
- Watch a favorite holiday movie.
- Make paper snowflakes.
- Read a Christmas bedtime story.
- Create handmade Christmas cards.
- Have a Christmas pajama night.
- Build a gingerbread house.
- Make homemade ornaments.
- Enjoy a family board game.
- Go on a neighborhood Christmas lights walk.
- Prepare hot chocolate together.
- Have a Christmas music dance party.
Kindness And Giving Ideas
- Make a card for a grandparent.
- Donate a gently used toy.
- Help wrap a Christmas present.
- Give someone a heartfelt compliment.
- Help prepare a family meal.
- Write a thank-you note.
- Do something helpful for a sibling.
- Make a small gift for a neighbor.
You can even create a themed Advent calendar by filling it entirely with family activities, acts of kindness, or Christmas crafts.
Mom Tip: Keep a few flexible activity cards ready. If you’re having a busy day, swap a complicated activity for something simple like reading a holiday book together.
Homemade Advent Calendar For Kids
A homemade Advent calendar doesn’t need to look professionally made to be beautiful.
Actually, the little imperfections are often what make DIY Christmas decorations feel so special.
For this project, we’ll create a hanging Advent calendar using 24 small paper bags, string, and clothespins.
It’s a simple design that works well in a living room, playroom, or children’s bedroom.
You can customize the bags with numbered stickers, colorful paper, Christmas stamps, or drawings made by your kids.
If you want a more rustic appearance, use brown kraft bags and natural twine.
For a bright and playful version, choose red and green bags with colorful ribbons.
Ways to personalize your homemade calendar:
- Add your child’s name to the top.
- Use different Christmas stickers on each bag.
- Attach tiny paper stars or snowflakes.
- Decorate the display with artificial greenery.
- Include a special Christmas Eve surprise.
- Let siblings take turns opening the daily bags.
If you have multiple children, you can make individual calendars or create one shared family countdown.
A shared calendar is especially helpful if you want to focus on activities rather than buying several small gifts every day.
The goal isn’t to make the fanciest Advent calendar. It’s to create a Christmas tradition your family genuinely enjoys.
DIY Advent Calendar For Kids Christmas Countdown
Ready to make your own Christmas countdown?
This easy DIY Advent calendar uses inexpensive supplies and can be completed in an afternoon.
The finished calendar features 24 numbered paper bags hanging from several rows of twine. Each bag holds a little Christmas surprise or family activity.
It’s lightweight, easy to display, and simple to store for next year.
Materials
Gather the following supplies before beginning your homemade Advent calendar.
- 24 small paper bags or kraft gift bags
- 24 mini wooden clothespins
- Twine, ribbon, or sturdy string
- Number stickers from 1 to 24
- Scissors
- Washable markers or paint pens
- Christmas-themed stickers
- Decorative washi tape
- Removable wall hooks or another secure hanging method
- Small treats, activity cards, or age-appropriate surprises
Optional Decorations:
- Mini Christmas ornaments
- Artificial pine garland
- Paper snowflakes
- Small bows
- Glittery star stickers
- Battery-operated fairy lights
You can find most of these materials at craft stores, discount shops, or around your home.
If you don’t have paper bags, small envelopes work just as well for activity cards and flat surprises.
Instructions
Step 1: Prepare Your Paper Bags
Lay out all 24 paper bags on a clean surface. Make sure each one is large enough to hold the surprise or activity card you plan to include.
If you’re using plain kraft bags, this is the perfect time to decorate them with festive stickers, washi tape, or colorful drawings.
Step 2: Number Each Bag
Label your bags from 1 through 24 using number stickers or a marker.
Make the numbers large and easy to read so children can quickly find the correct bag each morning.
For younger kids, colorful numbers can also provide a fun opportunity to practice number recognition.
Step 3: Fill The Bags With Surprises
Place a small gift, treat, or folded activity card inside each bag.
Try alternating between physical surprises and meaningful family activities.
Save something extra special for December 24, such as a new Christmas bedtime story or a family movie night coupon.
Step 4: Set Up Your Hanging Strings
Choose a wall or display area for your Advent calendar.
Cut several lengths of twine and hang them horizontally using secure hooks.
You can arrange the strings in four rows with six bags on each row, or create a Christmas tree shape with shorter rows at the top and longer rows below.
Step 5: Attach The Numbered Bags
Use wooden clothespins to clip each bag onto the twine.
Arrange them in numerical order so your child can follow the countdown easily.
Space the bags evenly to keep the display neat and prevent the strings from sagging.
Step 6: Add Festive Decorations
Once all 24 bags are hanging, add your favorite Christmas decorations.
A little artificial greenery, ribbon, or a few paper stars can make the display feel extra festive.
Keep decorations lightweight so the strings and hooks can safely support everything.
Step 7: Start Your Christmas Countdown
On December 1, invite your child to open the first bag.
Continue opening one bag each day until Christmas Eve.
You can make it part of your morning routine or save the surprise for after school.
Either way, your homemade Advent calendar will give your children something wonderful to anticipate throughout December.
Notes
Here are a few helpful tips to make your DIY Advent calendar easier, safer, and more enjoyable for the whole family.
1. Make It Reusable
Choose sturdy paper bags or fabric pouches if you’d like to use the same calendar for several Christmas seasons.
After the holidays, carefully fold the bags and store them with your Christmas decorations.
2. Keep The Budget Simple
You don’t need to purchase 24 gifts to create an exciting countdown.
Free activities, handwritten notes, and homemade treats can fill most of the calendar.
You might even use small craft supplies you already own.
3. Plan Activities Around Your Schedule
If you’re including special family outings or baking activities, check your December calendar before assigning them to specific dates.
Save longer activities for weekends and keep school-night surprises simple.
4. Consider Your Child's Age
For toddlers and preschoolers, avoid small objects that could become choking hazards.
Keep strings, ribbons, bags, and tiny decorations out of reach of very young children. Adult supervision is important, especially with hanging displays.
5. Make It Work For Siblings
If multiple children are sharing one Advent calendar, include activities everyone can enjoy.
For gift days, place one small surprise for each child inside the bag, or let children take turns opening it.
6. Don't Worry About Perfection
Some days may be busy, and you might forget to open a bag.
That’s completely fine!
Simply continue the countdown the next day or enjoy two surprises together.
7. Create A Special Christmas Eve Tradition
Consider making the final bag extra meaningful.
You could include a handwritten letter, a Christmas story, matching holiday socks, or a coupon for a cozy family activity.
It’s a sweet way to celebrate the end of the countdown.
A DIY Advent calendar for kids is so much more than a Christmas decoration. It’s a simple way to build excitement, encourage family connection, and make the holiday season feel special.
Whether you fill yours with chocolates, little gifts, Christmas crafts, or acts of kindness, your children will remember the joy of discovering something new each day.
And years from now, those little paper bags and daily surprises might become one of their favorite Christmas memories.
Happy crafting, and enjoy every magical moment of your Christmas countdown!